Build A Business Blog – Posts, Pages, Widgets, and More!
Before going any further, we need to really discuss the different tools you have on your new dashboard to fully understand what each one does and how you can use them to your benefit to maximize the success of your blog and business.
This post may contain affiliate links which means we receive a small commission at no cost to you when you make a purchase. As an Amazon Associate, I earn from qualifying purchases.
PAGES
Pages are where you will keep static information on your blog. “Static” means that for the most part, it does not change.
You can always go in and edit them, but these are good for the content that stays consistent in your business.
Pages are good for content such as your About, your Contact form, Hostess Rewards, Business Opportunity, etc.
POSTS
Posts are where you will do most all of your updating on your blog. Posts are where you will write things like product reviews, recipes, life stories, etc.
Every new post will replace the last post on your blog – moving the previous post down below – so that the newest content is always first.
CATEGORIES
Categories are like file folders for your posts. They keep your posts organized with specific themes.
So, for instance, you may have a “new products” category that you will put all of your product posts in, a “Recipes” category where you share favorite meals, etc.
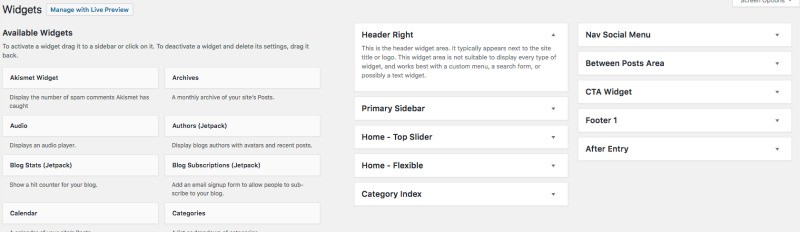
WIDGETS
Widgets are found under the Appearance tab and allow you to add content and features in the widgetized areas of your theme which is mostly the sidebar.
However, these widget-ready areas can be in the header, footer, sidebar, below content, and basically any other area in your theme.
You can drag and drop different widgets (including most plugins) into the different areas based on your particular theme.
PLUGINS
Plugins are what makes a self-hosted WordPress WONDERFUL! Plugins will be the functionality of your blog – from your subscriptions to auto-posting to your social media site to optimizing your photos to keeping spam comments to a minimum.
There are free plugins and paid plugins – we will be diving more into plugins later in our series.
MENUS
Menus are your navigation that generally goes along the top of your blog – above or below the header. Depending on your theme you will have one or two menu areas – main nav and sub nav.
You can choose to use one or both – but remember the simpler the better. You can put pages, posts, categories, or even outside links into your Menu. Click here to learn How To Create a Menu in WordPress.
HOMEWORK:
- Spend some time “playing” in your dashboard. See what the different tools can do. Remember to stay out of anything “Editor” that looks like coding – everything else can be fixed 😉
- Create your first PAGES. You can begin creating your first Pages and putting them in your Menu. Page suggestions include a Contact Page, Host Rewards Page, and Business Opportunity Page. On these pages, you will use your own words to highlight the opportunities, products, and services you offer. Remember to let your personality shine!
- Write your first blog post announcing your blog. Introduce yourself and tell your readers what they can expect from your blog. Share this blog on social media to announce the “birth” of your new blog!
- GET EXCITED!!!! Your blogging journey is officially getting started!